What d'ya know, it's been since last July since I posted! Having a family will do that sometimes. ;)
Today I wanted to post quick about a few new gardening methods I've discovered and am thinking about trying out this year.
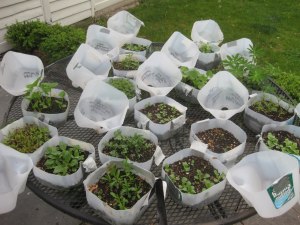
The first is called Winter Sowing. I discovered information on this method here: http://www.agardenforthehouse.com/2012/11/winter-sowing-101-6/
This method uses milk jugs or any other clear plastic jug, filling it with dirt, planting seeds, and leaving them outside overwinter. The seeds sprout in the spring when it's warm enough, sooner because they are all in mini "greenhouses". The info in the website is very easy to read and understand. The writer lives in New York, where they get very cold winters, so I'm assuming this method would be very successful here in the pacific northwest where our winters are very mild. I currently have three jugs of sweet peas outside, we'll see how they do! I'm hoping to add more if I can to help get a head start on my plants.
The second one is called straw bale gardening. There is a youtube video about it here:
https://www.youtube.com/watch?v=CmDhVhqSXNw
In this method he uses straw bales as a border around his garden bed, and then is also planting tomatoes right in the bale! Would be interesting to try, although I was reading in some of the comments that slugs liked to hide in the bales. May be beneficial for plants that like a lot of heat.
Tuesday, March 19, 2013
Friday, July 20, 2012
Low Maintenance Gardens
I am severely overdue for putting my thoughts in my blog, but baby and kiddos have been keeping me busy!
I just wanted to put a quick note in here because I found a great blog post that I loved. It's on the ideology of low maintenance gardens, by a landscape designer.
Here's the link to the blog entry he wrote:
http://landscapeofmeaning.blogspot.com/2012/07/why-i-dont-believe-in-low-maintenance.html#more
I very much enjoyed his writing and agree with all his thoughts. Some very interesting things to think and garden about!
I just wanted to put a quick note in here because I found a great blog post that I loved. It's on the ideology of low maintenance gardens, by a landscape designer.
Here's the link to the blog entry he wrote:
http://landscapeofmeaning.blogspot.com/2012/07/why-i-dont-believe-in-low-maintenance.html#more
I very much enjoyed his writing and agree with all his thoughts. Some very interesting things to think and garden about!
Thursday, April 26, 2012
Tomatoes!
So I have never tried to grow my own tomatoes since I've always been told they are hard to grow from seed. But then I went to a local seed swap several months ago and there was a guy there giving out tomato seeds. I asked him about what I'd heard, and he insisted it was easy to grow tomatoes from seeds as long as you kept them in bright light. So I took some seeds and decided to try!
I planted the five seeds he gave me about two months ago (I forgot to date the label marker) and lo and behold, they are growing!
This is them now. Four of the seeds sprouted, one was small so I thinned that and then sepparated the other three to their own pots. They have already suffered through getting sunburned (go figure, who knew it could happen in Seattle) and my son plucking off several leaves, but they are truckin' on nicely!
I will also stop here and mention (I may have before) that I did buy a grow light ($8 from Home Depot) that I have been starting all my seeds under. I think that makes a big difference since I have extremely limited sunny window sill space.
Then my mom got some tomato seeds that a store was getting rid of since they are a year old, and I decided to try more tomatoes.
On April 3rd I started a few to see how they'd germinate and here they are now:
The seeds germinated quite well, I actually had almost all the seeds sprout and I had to thin the seedlings (something I hate doing, but I'm getting better at doing it). So then on April 14th I planted half a flat of tomato seeds. They all sprouted beautifully and I finally just thinned them today since they all are growing a true set of leaves:
I'm pretty excited to see how they do the rest of the year. Last year most of our tomatoes got what we think was blight (from the early spring rains they were subjected to), so this year we are hoping to make a little clear plastic overhang that will protect the tomatoes from getting wet but allow the sun to come through. I also plan on training all my tomatoes to grow up twine, and luckily all my tomatoes are indeterminate so they should work well.
I did just discover the difference between the kinds of tomato plants and even my mom didn't know!
Indeterminate (the most common kind) continue to grow and produce fruit until the frost kills them.
Determinate (called "bush" tomatoes) grow to a certain size, produce a crop of fruit, and then die back.
I realized last year I think I bought a bunch of bush tomatoes and then was trying to prune them to grow up twine while the poor things just wanted to stop growing and produce a crop of tomatoes! That may explain why several of my tomatoes didn't produce very well.
I planted the five seeds he gave me about two months ago (I forgot to date the label marker) and lo and behold, they are growing!
This is them now. Four of the seeds sprouted, one was small so I thinned that and then sepparated the other three to their own pots. They have already suffered through getting sunburned (go figure, who knew it could happen in Seattle) and my son plucking off several leaves, but they are truckin' on nicely!
I will also stop here and mention (I may have before) that I did buy a grow light ($8 from Home Depot) that I have been starting all my seeds under. I think that makes a big difference since I have extremely limited sunny window sill space.
Then my mom got some tomato seeds that a store was getting rid of since they are a year old, and I decided to try more tomatoes.
On April 3rd I started a few to see how they'd germinate and here they are now:
The seeds germinated quite well, I actually had almost all the seeds sprout and I had to thin the seedlings (something I hate doing, but I'm getting better at doing it). So then on April 14th I planted half a flat of tomato seeds. They all sprouted beautifully and I finally just thinned them today since they all are growing a true set of leaves:
I'm pretty excited to see how they do the rest of the year. Last year most of our tomatoes got what we think was blight (from the early spring rains they were subjected to), so this year we are hoping to make a little clear plastic overhang that will protect the tomatoes from getting wet but allow the sun to come through. I also plan on training all my tomatoes to grow up twine, and luckily all my tomatoes are indeterminate so they should work well.
I did just discover the difference between the kinds of tomato plants and even my mom didn't know!
Indeterminate (the most common kind) continue to grow and produce fruit until the frost kills them.
Determinate (called "bush" tomatoes) grow to a certain size, produce a crop of fruit, and then die back.
I realized last year I think I bought a bunch of bush tomatoes and then was trying to prune them to grow up twine while the poor things just wanted to stop growing and produce a crop of tomatoes! That may explain why several of my tomatoes didn't produce very well.
Monday, April 2, 2012
My First Lasagna Garden Bed!
Today I put together my very first Lasagna garden bed!
I used old fence boards to make a small, 5 x 4 foot grow box which will be one of six that will hold most of the veggies I am planning to grow this year. I have some leeks I started in the house I would like to get outside, so I am trying to throw together a grow box to put them in!
I put cardboard on the bottom, then paper bedding from my gerbils, then did a layers of peat moss, grass clippings, peat moss, dried leaves, green leaves, grass clippings, and a final thick layer of peat moss.
The box is still not as full as I would like it to be, but I'm short on things to fill it with right now, and since with leeks you "hill up" around them as they grow to promote a longer white part, I figure it will work to plant them in the box as it is now and then I can add more later.
I plan on getting some hay/horse manure from my parents house to help fill my boxes.
I used old fence boards to make a small, 5 x 4 foot grow box which will be one of six that will hold most of the veggies I am planning to grow this year. I have some leeks I started in the house I would like to get outside, so I am trying to throw together a grow box to put them in!
I put cardboard on the bottom, then paper bedding from my gerbils, then did a layers of peat moss, grass clippings, peat moss, dried leaves, green leaves, grass clippings, and a final thick layer of peat moss.
The box is still not as full as I would like it to be, but I'm short on things to fill it with right now, and since with leeks you "hill up" around them as they grow to promote a longer white part, I figure it will work to plant them in the box as it is now and then I can add more later.
I plan on getting some hay/horse manure from my parents house to help fill my boxes.
Tuesday, March 27, 2012
Lasagna Gardening
I've previously been exposed to Lasagna Gardening because my mom did it for several years when she first put up her above-ground grow boxes. This year I have really been wanting to expand my growing space, and unfortunately the only good growing spaces are where my lawn is. I have already started by putting cardboard down on top of the grass (I knew that much from my mom) but I did a little research into what exactly goes into a Lasagna Garden. I am interested in the aspect of being able to layer right on top of lawn and keep the weeds down, and hope that it will also help me save money on buying dirt.
The expert and inventor of Lasagna Gardening appears to be Patricia Lanza, who wrote the book "Lasagna Gardening" (the book my mom got when she dove into this endeavor). I found a great intro article by her in the Mother Earth News page here:
http://www.motherearthnews.com/Organic-Gardening/1999-04-01/Lasagna-Gardening.aspx
After reading several other blogs and comments on this method, I have definitely decided to try it out! It's a very simple method, and I think I can get many "ingredients" from my parents (since they have chickens, goats, and a horse that all produce fabulous manure). We'll have to see how it goes!
The expert and inventor of Lasagna Gardening appears to be Patricia Lanza, who wrote the book "Lasagna Gardening" (the book my mom got when she dove into this endeavor). I found a great intro article by her in the Mother Earth News page here:
http://www.motherearthnews.com/Organic-Gardening/1999-04-01/Lasagna-Gardening.aspx
After reading several other blogs and comments on this method, I have definitely decided to try it out! It's a very simple method, and I think I can get many "ingredients" from my parents (since they have chickens, goats, and a horse that all produce fabulous manure). We'll have to see how it goes!
Sunday, March 4, 2012
The First Seeds!
It has only been a little over a week and my seeds are all sprouting and growing fabulously!
This year I purchased a plant light from Home Depot and suspended it using a cord from an old paper lantern style light fixtures (without the shade). The results have been better than I expected! The light provides a lot of warmth and the seeds have all been sprouting in a matter of days! These seeds were all started on February 24th and came up only a couple days after I planted them.
Friday, February 17, 2012
Starting Green Onions and Garlic
And here's a bonus I've learned: chives are perrenials! If you harvest only half of the onions, the rest will keep growing and multiply into more the next year!
Any type of onion bulb or garlic can also be growin into a full plant.
For bulb onions or garlic, simply let them sit somehwere, preferrably warm and with some light, and they will start to grow (after all, they are a bulb). For garlic, each individual clove will sprout and can be grown and will produce a whole new bulb with lots of cloves.
(Disclaimer: I have only ever grown garlic this way, so I cannot personally attest to the success of onions grown this way. Depending on the type of onion, they may in fact need two years to grow to full size. However, they are edible at any size!)
Garlic and onions are fairly cold hardy, so here in the pacific northwest farmers are already growing them out in their feilds. Some even start them in the fall and grow them over the winter!
Last year I planted garlic in my garden (simply by planting old cloves that had sprouted) and then planted pole beans among them not knowing that beans and garlic don't like each other (and also thinking the beans were the bush type). The pole beans completely smothered out my garlic, and then after I pulled out all the pole beans in the fall, my garlic all started growing again! They have been out there all winter and have kept growing even through a week of cold snow very uncharacteristc of Seattle.
Thursday, February 16, 2012
Feruary's Seeds & The Newspaper Pot
This month I have a few seeds I'm trying to start. They consist of the seeds that I think will take the most time to reach maturity/harvestability.
Leeks and Chives both have a long period of time before maturity (as do most onions I'm finding) and then I have several flowers, including German Chamomile and some seeds gathered from my own perennial plants (of which I do not know the names). Last year I grew lots of flowers, like snapdragons, marigolds, and nasturtiums, but the snapdragons especially took FOREVER to grow! And then those snapdragons survived all winter out there (we even had a good week of lots of snow!). I can't find my snapdragon seeds (maybe I used them all up last year) but I am starting some other flowers early just in case.
Last year and this instead of buying seed flats (which I may still do later for my veggies) I am using a newpaper-pot maker. It's a small wooden two-piece contraption that you use to make little newspaper pots that then can have seeds grown in them and be transplanted straight into the ground. This really helps with the money side, and I feel good recycling newspaper instead of buying more plastic pots.
Leeks and Chives both have a long period of time before maturity (as do most onions I'm finding) and then I have several flowers, including German Chamomile and some seeds gathered from my own perennial plants (of which I do not know the names). Last year I grew lots of flowers, like snapdragons, marigolds, and nasturtiums, but the snapdragons especially took FOREVER to grow! And then those snapdragons survived all winter out there (we even had a good week of lots of snow!). I can't find my snapdragon seeds (maybe I used them all up last year) but I am starting some other flowers early just in case.
Last year and this instead of buying seed flats (which I may still do later for my veggies) I am using a newpaper-pot maker. It's a small wooden two-piece contraption that you use to make little newspaper pots that then can have seeds grown in them and be transplanted straight into the ground. This really helps with the money side, and I feel good recycling newspaper instead of buying more plastic pots.
It's super simple to use and since I'm using newspaper that comes in the mail, it's like getting free pots! My mother gave me the pot maker, but I think they are not too pricey and will easily pay for themselves especially if you grow from seed instead of buying young plants.
Garden 2012
It's already the middle of February of 2012! I have been thinking about my garden all winter long and now finally is the time I can start doing things.
I purchased all my seeds at the end of last month. I tried out two new seed companies this year: Bountiful Gardens (www.bountifulgardens.org) and Le Jardin du Gourmet (www.ArtisticGardens.com).
Bountiful Gardens is a sustainable agricultrure research company located Willits, CA. All their seeds are open-pollinated and heirloom, and most of them are also certified organic. Since I want to be able to learn how to gather my own seed for the next season, I chose to try out this company. They have an extensive amount of seeds they offer, and all are very reasonably priced. They only have seeds, so no live plants, so you have to be confident in your seed-growing, but I am very excited and am very impressed with the quality of their seed and what their business supports.
I actually found out about Le Jardin du Gourmet from a flyer in a mailer packet (go figure). They specialize in the "40 cent sample seed packets". Since this was very inexpensive I decided to give them a try even though I knew nothing more about them. Their website is obviously simple and not super proffesional-looking, but it's effective and I was very glad to have an option to order online. They had a very nice selection of garden fruits and veggies, and also had some live plant options. I opted to just try out their seed this year, but if they grow well I may try their live plants next year to add some more herbs and perrenials to my garden. They also sell onion and shallot bulbs which I may try next year. All their products are very reasonably priced, and the 40 cent seed packet option is just right for a small gardener like myself. I still got a very decent amount of seed in each packet, definitely enough for my one-family garden.
So now I have all my seeds. I have sorted them by the month in which I should start sprouting them. With my new baby it has been a challange to make time to actually get things done, but here's hoping she starts sleeping longer!
Friday, September 30, 2011
And they all came tumbling down
The other day I looked out my window, and much to my non-astonishment discovered a tragic sight.
Those pole beans finally did in the plastic posts I had attempted to support them with. Since I haven't been able to be using the beans anyway, and it's near the end of the season, I just pulled them all out, poles, twine, and all. It never ceases to astound me how much these pole beans just keep GROWING! And I still have the beans in my planter (on the right in this pic) so I am not lacking in beans after pulling these suckers out. (I am really hoping to get some seeds out of the beans still in there, but the weather is turning yucky real fast so I'm a little worried).
Next year we are most definitely doing something different with these beanies. I have thought about growing them against my house, but I think it does not get enough sun for beans. I have also debated about growing them up a part of my fence. The back fence would be ideal since it is chain-link, but our yard is quite large (three-quarters of an acre large) and I had a hard enough time getting out to pick the beans when they were right next to my house. I also may grow them up the fence behind my flower bed which is just off my house, and I know they'd get plenty of sun there. The only catch is that I would have to put some netting or fencing against the fence for them to grow up since it is a wood slat fence. And then there is my original idea of building a wood frame, which would look very attractive and still may be my method of choice but does require the most effort of the three.
Those pole beans finally did in the plastic posts I had attempted to support them with. Since I haven't been able to be using the beans anyway, and it's near the end of the season, I just pulled them all out, poles, twine, and all. It never ceases to astound me how much these pole beans just keep GROWING! And I still have the beans in my planter (on the right in this pic) so I am not lacking in beans after pulling these suckers out. (I am really hoping to get some seeds out of the beans still in there, but the weather is turning yucky real fast so I'm a little worried).
Next year we are most definitely doing something different with these beanies. I have thought about growing them against my house, but I think it does not get enough sun for beans. I have also debated about growing them up a part of my fence. The back fence would be ideal since it is chain-link, but our yard is quite large (three-quarters of an acre large) and I had a hard enough time getting out to pick the beans when they were right next to my house. I also may grow them up the fence behind my flower bed which is just off my house, and I know they'd get plenty of sun there. The only catch is that I would have to put some netting or fencing against the fence for them to grow up since it is a wood slat fence. And then there is my original idea of building a wood frame, which would look very attractive and still may be my method of choice but does require the most effort of the three.
A long and tiring time...
So I have not posted in a long time due to my pregnancy starting to really take its toll on my energy level! I have not even been out in my garden very much this month. All those poor beans I picked just got sent to the compost pile, because I just did not have the energy to blanch and freeze them! And then I just haven't even picked any beans after that! I even have a bowl full of tomatoes in my fridge right now that desperately need to be frozen. There is just a lot that needs to be done that hasen't been. I am getting some things done, but not as much as there is to do. *sigh* I didn't think quite far enough ahead when I decided to grow a full-blown garden this year. I have been learning a lot this year, though, so it's not a total loss. And we did get to eat quite a bit of the stuff from the garden, epsecially earlier in the season when I had more energy and it was exciting that things were starting to grow! I am glad for all the things I have been learning and am excited for next year to be able to do things even better (and hopefully with a lot more energy!) One idea I am getting really excited about for next year is to have a farm stand out in front of our house. I just kept thinking it was a shame to be composting so much of our garden's produce, and then I decided woudln't it be fun if I could try to sell some of it! And with a little more structure of the space out there, I could easily have plenty of plants growing lots of produce to sell! We'll see where I am next year but I am very excited to try out this idea.
Saturday, September 3, 2011
Veggie Pizza with Sorrel Sauce
I made this veggie pizza for myself tonight (made a more normal pizza for the rest of the family), and I thought it turned out the most delicious pizza I've ever tasted!
So this was after I had eaten one piece, and decided I just had to put it in here. It looks somewhat weird, but it tasted SO good!
The sauce I made with sorrel, which is a leafy green I discovered from my friend's farm this summer and absolutely love (and plan on growing next year!). It has a very strong lemony-taste and can be eaten both fresh or cooked. When you saute it, it "melts" into a sauce, which is fascinating! The whole leaf just kind of melts all apart. So for this pizza sauce, I sauteed some shallots in butter first, then added the sorrel leaves (with the stem parts removed - probably about ten medium-small leaves, they really melt down a lot) and sauteed that out until it was all melted down, then I poured in some heavy cream - just enough to make it a little thinner than I wanted, and then I simmered it for just a few minutes to thicken it up to be just the texture I wanted for my pizza.
Then I spread the sauce on the pizza, and topped it with sliced tomatoes and zucchini (the zucchini was sliced very thin) and covered it all with some parmasean cheese and mozzerella (I could have used more mozzerella, as you can see).
The sauce is what made the whole pizza! It was creamy and tangy, and complimented perfectly with the tomatoes and zucchini! I would have never thought before to put zucchini on a pizza (or sorrel for that matter) but it turned out spectatular! I shared a piece with my husband, and he said it was really good (this coming from a "I don't like veggies" guy). I definitely will be getting more sorrel from the farm this week and making this again (especially since I have TONS of tomatoes and zucchini coming out of my garden now!).
Now I just need to find a good gluten-free family sized pizza so I'm not having to do so many personal sized ones!
So this was after I had eaten one piece, and decided I just had to put it in here. It looks somewhat weird, but it tasted SO good!
The sauce I made with sorrel, which is a leafy green I discovered from my friend's farm this summer and absolutely love (and plan on growing next year!). It has a very strong lemony-taste and can be eaten both fresh or cooked. When you saute it, it "melts" into a sauce, which is fascinating! The whole leaf just kind of melts all apart. So for this pizza sauce, I sauteed some shallots in butter first, then added the sorrel leaves (with the stem parts removed - probably about ten medium-small leaves, they really melt down a lot) and sauteed that out until it was all melted down, then I poured in some heavy cream - just enough to make it a little thinner than I wanted, and then I simmered it for just a few minutes to thicken it up to be just the texture I wanted for my pizza.
Then I spread the sauce on the pizza, and topped it with sliced tomatoes and zucchini (the zucchini was sliced very thin) and covered it all with some parmasean cheese and mozzerella (I could have used more mozzerella, as you can see).
The sauce is what made the whole pizza! It was creamy and tangy, and complimented perfectly with the tomatoes and zucchini! I would have never thought before to put zucchini on a pizza (or sorrel for that matter) but it turned out spectatular! I shared a piece with my husband, and he said it was really good (this coming from a "I don't like veggies" guy). I definitely will be getting more sorrel from the farm this week and making this again (especially since I have TONS of tomatoes and zucchini coming out of my garden now!).
Now I just need to find a good gluten-free family sized pizza so I'm not having to do so many personal sized ones!
Friday, September 2, 2011
Garden Veggie Shepherd's Pie
Here's my on-the-fly version of a shepherd's pie kind of dish with my garden veggies:
(Ok, so I confess, those are ALL from my garden. Actually, only the green beans are. But those veggies COULD all be from my garden. I had some produce from a nearby farm that needing eating so those went in there instead. But I do have all the veggies in there growing in my garden, including the onion.)
All I did was put in chopped scallop squash, green beans, carrot, onion, and browned ground beef in a cassarole dish. I poured over that some chicken stock and cream, and added summer savory, salt, and pepper. Then I made up some biscuit dough (I'm gluten intollerant, so I use a gluten-free baking mix that is superb!) and dolloped that all on top. Then baked it at 350F (it might have been 375F) for about half an hour. The biscuits were nice and golden, though some of the veggies were still a little crisp, so it probably would have been better to cook on a lower temp for a little longer. But it was really yummy still! I was pretty proud of myself for being able to toss it all together, and even my husband said he really liked it. It's a keeper.
(Ok, so I confess, those are ALL from my garden. Actually, only the green beans are. But those veggies COULD all be from my garden. I had some produce from a nearby farm that needing eating so those went in there instead. But I do have all the veggies in there growing in my garden, including the onion.)
All I did was put in chopped scallop squash, green beans, carrot, onion, and browned ground beef in a cassarole dish. I poured over that some chicken stock and cream, and added summer savory, salt, and pepper. Then I made up some biscuit dough (I'm gluten intollerant, so I use a gluten-free baking mix that is superb!) and dolloped that all on top. Then baked it at 350F (it might have been 375F) for about half an hour. The biscuits were nice and golden, though some of the veggies were still a little crisp, so it probably would have been better to cook on a lower temp for a little longer. But it was really yummy still! I was pretty proud of myself for being able to toss it all together, and even my husband said he really liked it. It's a keeper.
Thursday, September 1, 2011
Tomato Pruning
So this year I tried a new method of pruning tomatoes that I learned from my farmer friend (this is how they do it on the farm and it's suppose to boost the plant's production). I'm not sure officially what it's called, but I call it the tall and skinny method.
It's simple - you find the main stem and prune the suckers out.
Not so simple is to figure out what exactly a sucker is.
But I tried it on a couple of my tomatoes, and I think I actually got it right finally on one! Here's what it looks like now:
This is one that I am growing under the eves of my house on my deck where it's nice and hot and sunny and the Seattle summer rains won't bother it. It has been growing fabulously, despite my son hacking at it several times with a pair of scissors (hence the reason it is pretty bare on that bottom half). As you can see it has grown very tall. I actually have twine strung up from the base of the plant to a nail in my house eves to support it, and that has been working quite well. It did take a little longer to show flowers and produce tomatoes, and I think starting to prune it earlier would have helped. But now it has got some tomatoes and lots more flowers in the works at the top!
It turns out the sucker is the little part that grows out between a leaf and the main stem:
And here's another pic (sorry it's fuzzy).
You can see with both of them the sucker grows out of the middle of the stem and the branch. So you let all the branches grow, just not these little suckers. If they grow, they become another stem. (That's how tomatoes normally get so bushy)
This method is suppose to help the plant concentrate on just that one main stem and since it's spending less energy growing stems all over the place it's supposed to grow more fruit.
(And another benefit of the tall and skinny method: my kids can't reach all the tomatoes!! Hooray to actually having tomatoes ripen on the vine!)
I really like this method, and next year I plan on doing it with all my tomatoes. It saves on tomato support as well - they will all only need one long stake or some stringing up like I did here!
A side note: as you can see I have basil planted in the pot with the tomato. According to my new favorite book, Roses Love Garlic and Carrots Love Tomatoes, it is mutually beneficial to grow basil and tomatoes together and since I love cooking with basil I love that I can have it grow with the tomatoes right by my back door! (Tomatoes are also good to grow with a whole slew of other plants because apparently they have a chemical they produce in their roots that deters a lot of bugs that pester other plants). I highly reccomend this book. I wish I had gotten it earlier since it is a fabulous book and very fascinating! I plan on using that book as my guideline for planning next years garden! (Something to do during those cold winter months when I can't be out there in the dirt!)
It's simple - you find the main stem and prune the suckers out.
Not so simple is to figure out what exactly a sucker is.
But I tried it on a couple of my tomatoes, and I think I actually got it right finally on one! Here's what it looks like now:
This is one that I am growing under the eves of my house on my deck where it's nice and hot and sunny and the Seattle summer rains won't bother it. It has been growing fabulously, despite my son hacking at it several times with a pair of scissors (hence the reason it is pretty bare on that bottom half). As you can see it has grown very tall. I actually have twine strung up from the base of the plant to a nail in my house eves to support it, and that has been working quite well. It did take a little longer to show flowers and produce tomatoes, and I think starting to prune it earlier would have helped. But now it has got some tomatoes and lots more flowers in the works at the top!
It turns out the sucker is the little part that grows out between a leaf and the main stem:
And here's another pic (sorry it's fuzzy).
You can see with both of them the sucker grows out of the middle of the stem and the branch. So you let all the branches grow, just not these little suckers. If they grow, they become another stem. (That's how tomatoes normally get so bushy)
This method is suppose to help the plant concentrate on just that one main stem and since it's spending less energy growing stems all over the place it's supposed to grow more fruit.
(And another benefit of the tall and skinny method: my kids can't reach all the tomatoes!! Hooray to actually having tomatoes ripen on the vine!)
I really like this method, and next year I plan on doing it with all my tomatoes. It saves on tomato support as well - they will all only need one long stake or some stringing up like I did here!
A side note: as you can see I have basil planted in the pot with the tomato. According to my new favorite book, Roses Love Garlic and Carrots Love Tomatoes, it is mutually beneficial to grow basil and tomatoes together and since I love cooking with basil I love that I can have it grow with the tomatoes right by my back door! (Tomatoes are also good to grow with a whole slew of other plants because apparently they have a chemical they produce in their roots that deters a lot of bugs that pester other plants). I highly reccomend this book. I wish I had gotten it earlier since it is a fabulous book and very fascinating! I plan on using that book as my guideline for planning next years garden! (Something to do during those cold winter months when I can't be out there in the dirt!)
The Tomatoes Are Coming!
My tomato plants FINALLY started pumping out their tomatoes!
Here's today's harvest (I got about the same amount yesterday too but gave them to my mom since she helped fund most of our tomato plant section)
Aren't they pretty!
We've got several varieties out there. Most are normal red tomatoes (some roma-style, some beefsteak), but we've also got a couple Green Cheroke tomato plants (the yellowish-green tomato front and center) and Purple Cheroke plants (hard to see in this pic, they are just slightly purple-ish - the one in the upper left corner is one).
Many of the plants have started not looking very happy about a month ago, but they still seem to be able to give us some tomatoes.
I plan on freezing most of my tomatoes. I was going to can them, but I am a bit intimidated by the whole process plus I'm not sure I'll have time (or energy - pregnancy really sucks that out of you). Freezing is just so much simpler, and it's suppose to better preserve their nutrients. I did research yesterday on how to freeze tomatoes, and there are several ways, but the simplest is to cut out the stem scar and surrounding hard area, then freeze whole on a cookie sheet. After they're frozen you put them all in a ziplock bag and pull them out as you need them. To get the skin off, supposidly you can simply put the frozen tomato under hot running tap water and the skin is supposed to sepparate and come off. I guess we'll be seeing how it works this winter!
Obviously you really can only use frozen tomatoes for sauce and such, since freezing them gives them a mushy texture (I suppose that would be a benefit of canning). But since that's pretty much all I use canned tomatoes for anyway, I think I'll be good.
Here's today's harvest (I got about the same amount yesterday too but gave them to my mom since she helped fund most of our tomato plant section)
Aren't they pretty!
We've got several varieties out there. Most are normal red tomatoes (some roma-style, some beefsteak), but we've also got a couple Green Cheroke tomato plants (the yellowish-green tomato front and center) and Purple Cheroke plants (hard to see in this pic, they are just slightly purple-ish - the one in the upper left corner is one).
Many of the plants have started not looking very happy about a month ago, but they still seem to be able to give us some tomatoes.
I plan on freezing most of my tomatoes. I was going to can them, but I am a bit intimidated by the whole process plus I'm not sure I'll have time (or energy - pregnancy really sucks that out of you). Freezing is just so much simpler, and it's suppose to better preserve their nutrients. I did research yesterday on how to freeze tomatoes, and there are several ways, but the simplest is to cut out the stem scar and surrounding hard area, then freeze whole on a cookie sheet. After they're frozen you put them all in a ziplock bag and pull them out as you need them. To get the skin off, supposidly you can simply put the frozen tomato under hot running tap water and the skin is supposed to sepparate and come off. I guess we'll be seeing how it works this winter!
Obviously you really can only use frozen tomatoes for sauce and such, since freezing them gives them a mushy texture (I suppose that would be a benefit of canning). But since that's pretty much all I use canned tomatoes for anyway, I think I'll be good.
My First Green Bean Crop & Thoughts on Pole Beans
Those pole beans all of a sudden have started producing green beans out my ears! Here is my very first full crop picking of green beans (minus some that got eaten on the way in):
I'm so proud!
I was going to freeze them, but after cutting them all up, my mom told me that it's really best to use only the skinnier, younger green beans for freezing, not the bigger lumpy ones. *bummer* So I'll have to start really being better at picking when they're young, which I haven't been.
I did have some thoughts come while I was picking.
I have two areas of pole beans, one long double row which I made a fancy twine lattice for all the plants to grow up, and another bunch in teepee style.
Here they are when the plants were young:
And now this is what they look like!
At first I thought the teepee style looked much nicer (plus took MUCH less time to do). But as they've grown the plants in the teepee have way overgrown their stakes and fallen back down around and all over the place, so now it looks more like a pillar than a teepee. And they are bunched really close together. The plants in the lattice have also grown everywhere, but are still spaced much farther apart. As a result, I discovered while picking, the beans on the lattice plants are much easier to see and pick, where the teepee beans are all hidden underneath all that overgrown folliage and very hard to pick!
The one problem I have run into with the lattice plants is that the stakes I used for the ends are too weak to support all that growth (I had no idea they would grow THAT much!) and they have started bending over. I've had to make-shift supports by tying rocks on twine to the end poles to pull them back out.
So next year, I have two ideas for how to better grow pole beans (which I think I may still grow since it's fun to watch them grow crazy! And I can get seeds from my plants this year).
One is to build a sturdy frame out of wood with sides & beams across the top box-style - untreated pine probably since I have some already - and then I can string the twine down from that to the plants like I did before, only I think I will do two plants to a string intead of each plant getting it's own string.
The other idea I just had while reading Better Homes and Gardens and seeing how they use plants on verticle surfaces, is to grow the beans along one side of my house on my deck! I would just have to put pots on the ground, and then hook some netting onto the side of the house, and the beans would grow right up! It's north facing, so I'm not quite sure it will get enough sun, but it's warm and I think it may get just enough sun (I'll have to keep track and see if it's getting at least 6 hours).
I may try both methods in case the house one doesn't work.
Also I am going to do more pinching of the runners as they reach the top to hopefully not have so much overgrowth at the top and more bushiness down at the bottom (a tip from my mom).
I'm so proud!
I was going to freeze them, but after cutting them all up, my mom told me that it's really best to use only the skinnier, younger green beans for freezing, not the bigger lumpy ones. *bummer* So I'll have to start really being better at picking when they're young, which I haven't been.
I did have some thoughts come while I was picking.
I have two areas of pole beans, one long double row which I made a fancy twine lattice for all the plants to grow up, and another bunch in teepee style.
Here they are when the plants were young:
And now this is what they look like!
At first I thought the teepee style looked much nicer (plus took MUCH less time to do). But as they've grown the plants in the teepee have way overgrown their stakes and fallen back down around and all over the place, so now it looks more like a pillar than a teepee. And they are bunched really close together. The plants in the lattice have also grown everywhere, but are still spaced much farther apart. As a result, I discovered while picking, the beans on the lattice plants are much easier to see and pick, where the teepee beans are all hidden underneath all that overgrown folliage and very hard to pick!
The one problem I have run into with the lattice plants is that the stakes I used for the ends are too weak to support all that growth (I had no idea they would grow THAT much!) and they have started bending over. I've had to make-shift supports by tying rocks on twine to the end poles to pull them back out.
So next year, I have two ideas for how to better grow pole beans (which I think I may still grow since it's fun to watch them grow crazy! And I can get seeds from my plants this year).
One is to build a sturdy frame out of wood with sides & beams across the top box-style - untreated pine probably since I have some already - and then I can string the twine down from that to the plants like I did before, only I think I will do two plants to a string intead of each plant getting it's own string.
The other idea I just had while reading Better Homes and Gardens and seeing how they use plants on verticle surfaces, is to grow the beans along one side of my house on my deck! I would just have to put pots on the ground, and then hook some netting onto the side of the house, and the beans would grow right up! It's north facing, so I'm not quite sure it will get enough sun, but it's warm and I think it may get just enough sun (I'll have to keep track and see if it's getting at least 6 hours).
I may try both methods in case the house one doesn't work.
Also I am going to do more pinching of the runners as they reach the top to hopefully not have so much overgrowth at the top and more bushiness down at the bottom (a tip from my mom).
Today's Harvest!
Today I went out and got a great harvest from my garden!
LOTS of green beans, several summer scallop squash, three yellow zucchini, four tomatoes, five ears of corn (I could have pulled more probably), and my four walla walla onion, plus I cut some dahlias and hydrangeas. I just thought it looked so pretty all together!
I think most of my corn is finally harvestable! I've never grown corn, so I'm not sure how to tell it's ripe. But according to my mom, the tassles should be brown, and then she usually peaks to see if the corn looks developed. There are several ears out there on the bigger stalks (the ones I started indoors) that the husks on the corn have even started drying out, so I figured they were probably ready and picked five of those for us to have for dinner tonight. They were perfect! My whole famly loved them, and they are so much sweeter and crisper than when you buy them at the grocery store! Thought I am a little dissapointed that you only get one or two ears of corn per stalk! This summer I've been looking at a seed catalog (which my mom lost, so now I have to rememer which company it was for) that had a corn variaty that was multi-colored AND got 5-6 ears of corn per stalk! I think I will try that one next year.
My onions I really had no idea when to harvest them, and I guess with onions you can harvest them young and they taste just fine just smaller sized bulbs. I forgot to mark when I planted my onion starts, so I didn't know when the 110 day growing period was supposed to be up. But they had really just stopped growing (may be because kiddos kept ripping all their leaves off, the poor things), so I decided just to pull them up. One onion is HUGE! An awesome specimen of walla walla. The other three are just ok, one being really on the small side. This was a first time for onions as well, so it was a fun experiment! It will be fun to see if they taste sweet like walla wallas traditionally do when I go to use them!
LOTS of green beans, several summer scallop squash, three yellow zucchini, four tomatoes, five ears of corn (I could have pulled more probably), and my four walla walla onion, plus I cut some dahlias and hydrangeas. I just thought it looked so pretty all together!
I think most of my corn is finally harvestable! I've never grown corn, so I'm not sure how to tell it's ripe. But according to my mom, the tassles should be brown, and then she usually peaks to see if the corn looks developed. There are several ears out there on the bigger stalks (the ones I started indoors) that the husks on the corn have even started drying out, so I figured they were probably ready and picked five of those for us to have for dinner tonight. They were perfect! My whole famly loved them, and they are so much sweeter and crisper than when you buy them at the grocery store! Thought I am a little dissapointed that you only get one or two ears of corn per stalk! This summer I've been looking at a seed catalog (which my mom lost, so now I have to rememer which company it was for) that had a corn variaty that was multi-colored AND got 5-6 ears of corn per stalk! I think I will try that one next year.
My onions I really had no idea when to harvest them, and I guess with onions you can harvest them young and they taste just fine just smaller sized bulbs. I forgot to mark when I planted my onion starts, so I didn't know when the 110 day growing period was supposed to be up. But they had really just stopped growing (may be because kiddos kept ripping all their leaves off, the poor things), so I decided just to pull them up. One onion is HUGE! An awesome specimen of walla walla. The other three are just ok, one being really on the small side. This was a first time for onions as well, so it was a fun experiment! It will be fun to see if they taste sweet like walla wallas traditionally do when I go to use them!
Wednesday, August 24, 2011
Aphid Troubles Revisited
And update on my aphid issue. After many attempts to simply hose off the stinker aphids that didn't work, I did indeed go out and buy a spray bottle and fill it with warm water and about a teaspoon of dish soap (I estimated). I sprayed the one pot of sweet peas quite heavily with the soapy water solution, and because I found a couple aphids had crept onto the neighboring sweet peas, I sprayed them as well, tho not quite as heavily. I did this for two days in a row after watering.
Well, it worked as far as killing the aphids! There are now no aphids in sight. However, I don't think the plants liked it very much either, because right after the second day of spraying, the plants in the pot that I had sprayed heavily started to yellow. It has been at least a week, and they still look somewhat sad:
It is only the pot that had been heavily infested with aphids that yellowed like this, so I don't know if it was from the damage the aphids had done and it just didn't show up until after I sprayed, or if it was from the spray itself, perhaps because I sprayed too heavily.
After I noticed this and could see that there were no more aphids, I made sure to rinse off all the plants thouroughly to make sure there was no more soapy residue (in case that was what was damaging them). They looked sad for quite a while, tho just in the past couple of days they look like they are starting to recover.
Well, it worked as far as killing the aphids! There are now no aphids in sight. However, I don't think the plants liked it very much either, because right after the second day of spraying, the plants in the pot that I had sprayed heavily started to yellow. It has been at least a week, and they still look somewhat sad:
It is only the pot that had been heavily infested with aphids that yellowed like this, so I don't know if it was from the damage the aphids had done and it just didn't show up until after I sprayed, or if it was from the spray itself, perhaps because I sprayed too heavily.
After I noticed this and could see that there were no more aphids, I made sure to rinse off all the plants thouroughly to make sure there was no more soapy residue (in case that was what was damaging them). They looked sad for quite a while, tho just in the past couple of days they look like they are starting to recover.
The Sneaky Snipper Strikes Again
Today I woke up and let the dogs outside to discover this:
One poor pot got all its inhabitants totally snipped off! The poor tomato that had already gone through this once and was trying to recover, my nice basil plant and my ONLY blooming marigold that I had managed to grow from some very old seeds
And then he totally snippped off both my balsam flowers! This one especially had been growing beautifully! You can see the carnage littering the middle of the pot, that poor balsam.
That stinker sneaky snipper!
Now I have re-hidden the scissors and if I'm missing, you'll find me in the garden mourning.
AAAAAAAAAAAAAHHHHHH!!!
Somehow my son, who gets up a little before me, had found my garden scissors (which I had been working so hard to keep out of reach!) and snipped my beautiful tomato plants on our deck! Luckily these two guys were big enough that he couldn't snip them off at the stalk (tho snip marks on the stem say he tried) so instead he cut off most of the leaves! (I suppose I should be thankful he at least left the tomatoes on there.)
And then he totally snippped off both my balsam flowers! This one especially had been growing beautifully! You can see the carnage littering the middle of the pot, that poor balsam.
That stinker sneaky snipper!
Now I have re-hidden the scissors and if I'm missing, you'll find me in the garden mourning.
Friday, August 12, 2011
Aphid Troubles
I've been pretty lucky so far to not have too many bug problems, but my little knee-high sweet peas on my deck have recently gotten this stubborn infestation of aphids!
Here you can see the little buggers all over the tender tips of my pretty little sweet peas.
There are also these little tan-ish colored bugs that seem to hang out with the aphids. I don't know what they are, but they look kinda like aphids and they don't wash off when I hose off the plants, I have to pick them off by hand.
So after many attempts to hose off the stinkers every day (supposed to be one way you can get rid of them) and them coming back every day I have decided I need to up my attack. I did a little quick research, and found out from the website garden.getridofthings.com that you can use a homemade solution of 2 teaspoon mild dish soap with a bottle of lukewarm water to spray the plants, and it's supposed to wash off their waxy protective coating and cause dehydration. Sounds like a good next step. They had several other suggestions as well, one of which was to also put oil in the water/soap mix to clog their pores and suffocate them, but I think I'll start with the soap & water (since it warns not to spray the oil solution on hot days as it can damage the plant) and see how that goes. Hopefully I can get rid of these stinkers before they do any real damage!
Here you can see the little buggers all over the tender tips of my pretty little sweet peas.
There are also these little tan-ish colored bugs that seem to hang out with the aphids. I don't know what they are, but they look kinda like aphids and they don't wash off when I hose off the plants, I have to pick them off by hand.
So after many attempts to hose off the stinkers every day (supposed to be one way you can get rid of them) and them coming back every day I have decided I need to up my attack. I did a little quick research, and found out from the website garden.getridofthings.com that you can use a homemade solution of 2 teaspoon mild dish soap with a bottle of lukewarm water to spray the plants, and it's supposed to wash off their waxy protective coating and cause dehydration. Sounds like a good next step. They had several other suggestions as well, one of which was to also put oil in the water/soap mix to clog their pores and suffocate them, but I think I'll start with the soap & water (since it warns not to spray the oil solution on hot days as it can damage the plant) and see how that goes. Hopefully I can get rid of these stinkers before they do any real damage!
Subscribe to:
Posts (Atom)
